Secure Web Proctoring Guide
To comply with Ontario Ministry of Education guidelines for secure, authentic assessment, Async Academy uses a secure, privacy-first web proctoring system for final exams.
Our system does not require you to install intrusive desktop monitoring software or spyware on your computer. Instead, we combine a secure in-app editor with an external recording camera (such as your smartphone) to verify your identity and workspace authenticity.
Key Requirements & Rules
- Secure In-App Editor: You must write your exam draft directly inside the secure editor on the exam page. Copy-pasting is disabled to ensure all sentences are drafted live.
- Webcam Verification: You will start the proctor stream on the exam page to generate a dynamic 6-character Verification Code and rolling live clock on your monitor before starting.
- Continuous 3/4 Over-the-Shoulder Recording: You must record your entire writing session using an external camera (your smartphone on a stand or tripod). The video must start with a close-up verification, workspace scan, and introduction, and run continuously.
- Clear Desk & Digital Rough Notes: Your desk must be completely clear of all paper, books, notebooks, or extra screens. If you prepared rough work or an outline during the pre-exam phase, you must upload it digitally. Uploading your Rough Notes automatically unlocks the secure writing editor. You can view your uploaded notes securely inside the editor by clicking the Rough Notes button.
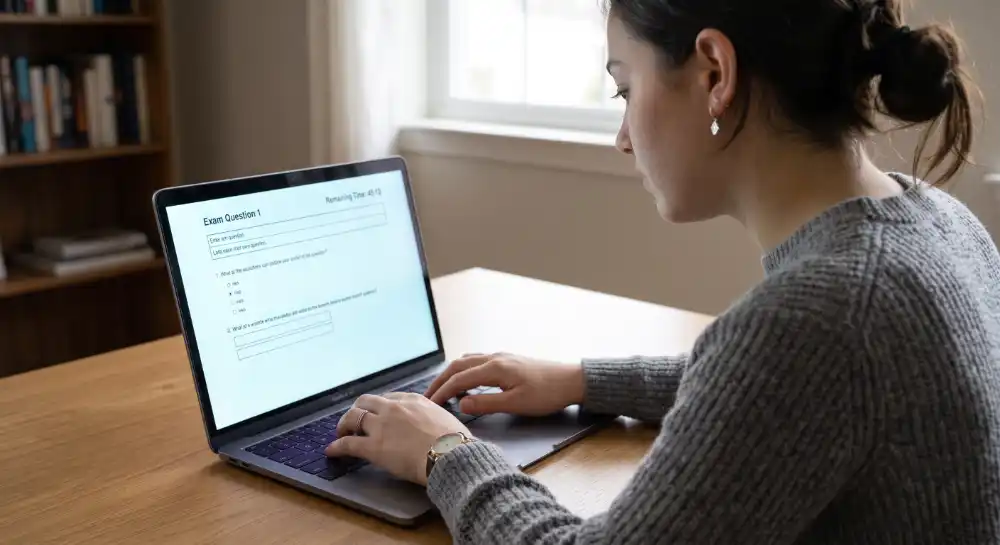
Desired 3/4 Camera Angle Setup
Your phone or recording camera must be positioned behind and to the side of you (a 3/4 angle) to capture a complete view of your writing environment.
The recording must clearly show:
- Your face and profile.
- Your hands and keyboard.
- Your computer monitor (displaying the Verification Code, the active editor, and the live clock).
- Your immediate desk surface (which must remain free of paper notes).
Refer to the example below for the correct camera placement:
Using the Digital Rough Notes Modal
To maintain a completely clear desk without losing access to your preparation notes and outline, use the digital Rough Notes button:
- Preparation Phase: Before starting your timed session, upload your preparation document (.md) using the "Rough Notes & Outline" submission slot on the exam page. You can also paste or edit your notes directly inside the modal before checking in.
- Writing Phase: Once you upload your notes, the secure writing editor automatically unlocks and the notes modal locks into read-only mode. You can open the modal at any time during writing to reference your outline, but editing or uploading is disabled.
- Pasting Restrictions: Pasting remains disabled inside the main essay draft textarea. You must type out your sentences live by referencing the read-only notes on your screen.
Submitting Your Proctor Recording (Google Drive)
Because exam recording sessions last up to 2 hours, the resulting video files are very large. To prevent upload timeouts, the default submission method is sharing a Google Drive link instead of uploading the video file directly.
Please follow these steps:
1. Adjust Recording Settings (720p @ 30 FPS)
Before starting your recording, open your smartphone/camera settings and set the video recording resolution to 720p at 30 FPS (or your device's lowest HD setting).
- Do not record in 1080p, 4K, or 60 FPS.
- Keeping the resolution to 720p keeps file sizes manageable and speeds up processing time.
2. Upload to Google Drive & Share Link
- Upload to Drive: Once your exam is finished, upload the video file directly to your student Google Drive (associated with your
@asyncacademy.caaccount). - Copy the Link: Right-click the uploaded file in Google Drive, select Share, copy the link, and ensure the access permissions are set so that your teacher/proctor can view it (e.g., set to "Asynchronous Academy" or "Anyone with the link").
- Submit the Link: Paste your copied Google Drive link directly into the Proctored Video Recording Link submission box on the exam page.
Step-by-Step Writing Routine
1. Pre-Exam Setup
Clear your desk, maximize your browser window to full screen, and close all other browser tabs, messaging apps (Discord, Slack, WhatsApp), and writing helpers (Grammarly). Set up your phone recording camera in the 3/4 angle position.
2. Start Proctor Stream
Check all compliance items on the checklist and click "Start Proctor Stream" to turn on your webcam, generate your 6-character Verification Code, and start the live clock.
3. Check-In Verification, Room Scan & Introduction
Start the recording on your phone. Perform the check-in verification:
- Self-Introduction: Stand in front of the camera, state your preferred name and course code, show that you're not wearing headphones, and read the 6-character Verification Code on your screen aloud.
- Room Scan: Pick up the phone/camera and perform a slow 360-degree pan of your entire room and desk environment, verifying that it is clear of all paper notes, extra screens, or other people.
- Legibility Check: Show a clear, close-up shot of the Verification Code and Clock on your computer monitor.
- tripod setup: Without stopping the video recording, place the camera back on the tripod/stand in the 3/4 angle position to capture the full view of your desk, keyboard, hands, and monitor.
4. Live Drafting
Once you upload your Rough Notes & Outline Google Doc, the Secure Editor will automatically unlock. You can begin writing immediately; you do not need to wait for a live proctor to click unlock. Type your essay into the secure textarea. Your draft is continuously auto-saved and synced to your teacher's dashboard. Keep the Verification Code and clock visible on screen.
5. Finalize & Submit
When finished, click "Finish & Save Draft" to lock in your submission. Walk over to your phone and stop the video recording. Finally, upload the recording to your Google Drive and paste the shared link in the last submission slot to complete the exam.